Monday, December 30, 2013

Christmas Composition Box

Good morning everyone :) Deann here with a Composition Box from Gina's Designs
( Available in January ) 


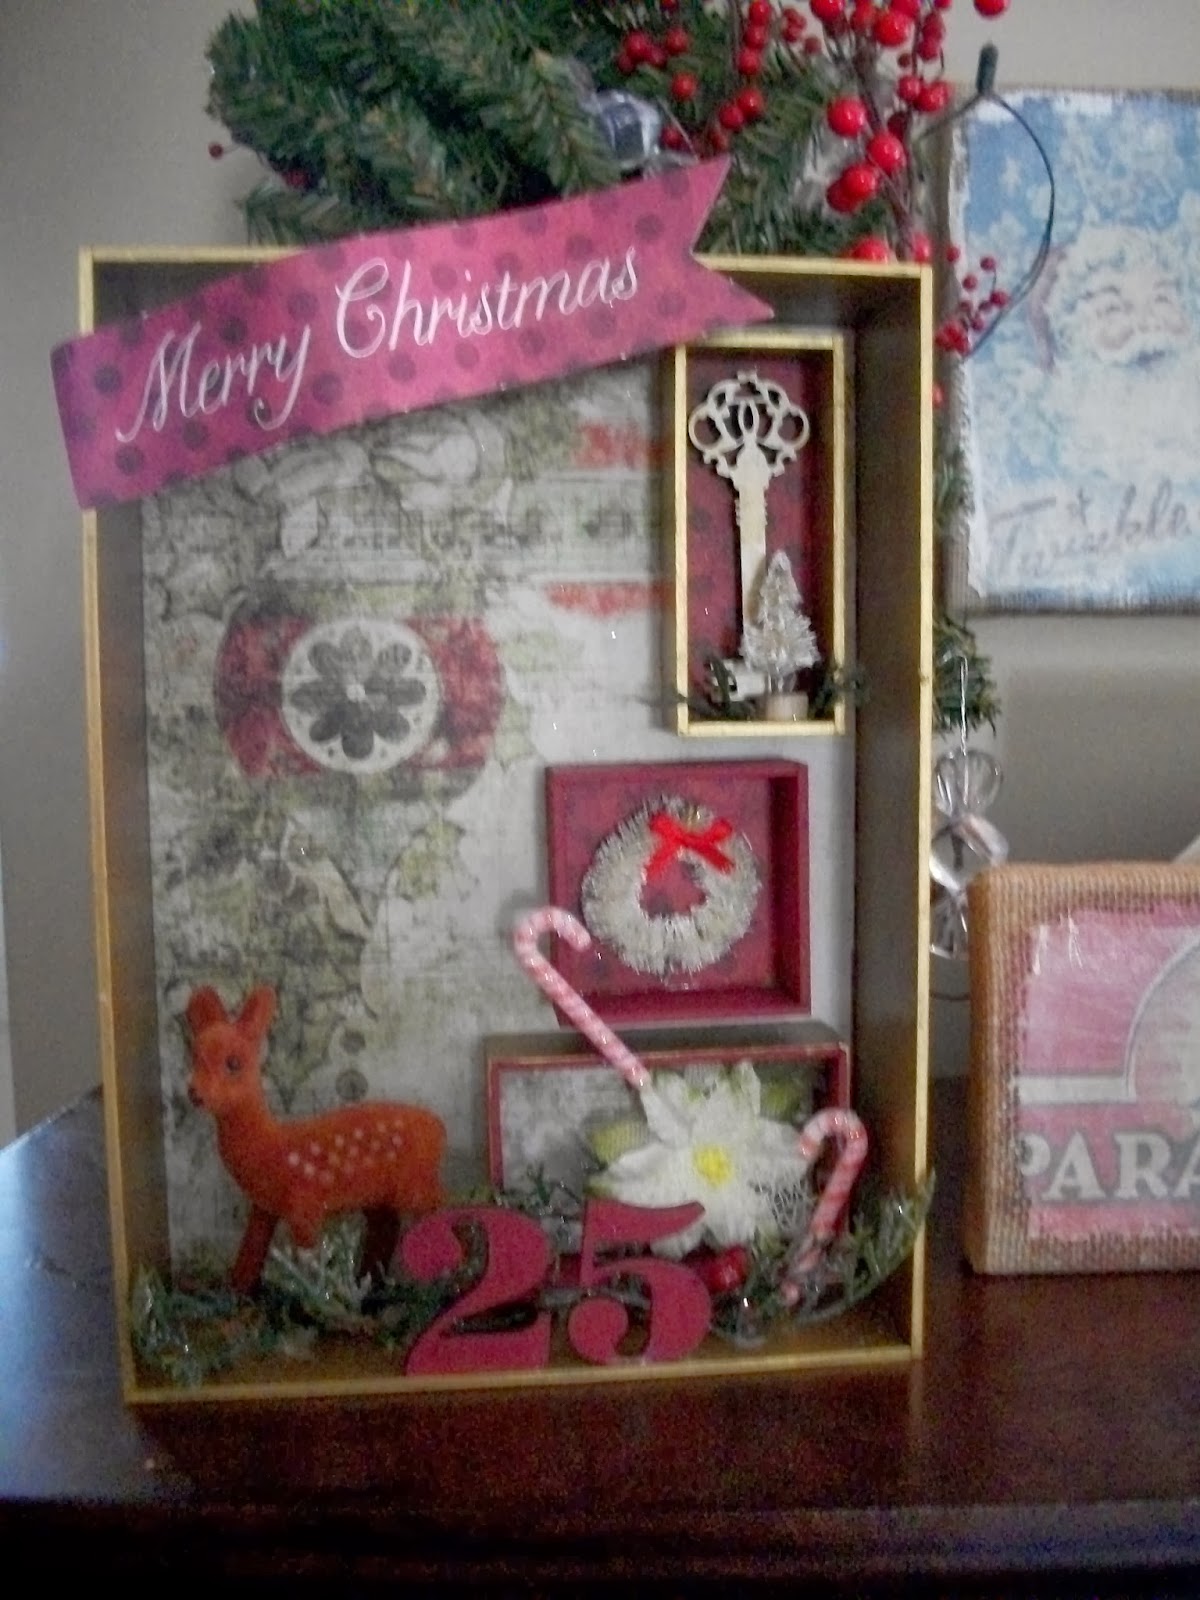
 The box comes with 3 smaller boxes, a key and the number 25.
Gina will also have these awesome Boxes in other themes!
Sweet 16, Valentine, St. Patrick's Day and lots more !


I painted the 25 and one of the boxes red and the rest of the boxes and the key gold. 


I used the MMI Christmas paper. 


Side view of the box.
Thanks for looking everyone ! As soon as the Composition Box is in the 
store I'll add the link :)
(((HUGS)))
Deann  

Thursday, December 19, 2013

Another JOY Banner

This one is for me :)
It looks great on my
sled !
Banner is from Gina's Designs. Paper is MME
(((HUGS))) 


Tuesday, December 17, 2013

May Arts Blog Challenge !

Good morning Crafty People :)
The May Arts Christmas Challenge is up 
and I have one of the spots ! WooHoo
Here is the link for the post :

All of the Ladies did an awesome job and there are lots of 
ideas for Christmas.
I made a JOY Banner for my project. The Banner is
from Gina's Designs and all the Ribbons are from May Arts

These are the awesome Ribbons that I received 
from May Arts Ribbon 


Thanks for taking a look  and I hope you give this a try
they are so fun to make !
(((HUGS)))
Deann

Thursday, December 12, 2013

Here are a few tags I made using Gina's Designs

 Good morning ,Deann here with 2 Christmas tags or they 
could be ornaments.

First up is a Christmas Mitten . I used a mitten shape from the
Mitten Micro Mini Album.
I first covered both sides with paper then inked the edges.
Next, I added a piece of Vintage lace to the cuff and over that
I added some shabby rose trim.  I thought it looked a little like fur.
I topped it off with a red seam binding bow and tied a mini candy cane
in the center  with red and white Bakers twine.
I added a blue snow flake ( I love light blue and red together) then a
Poinsettia over the snow flake.  I added 2 mini snowflakes  from
the Snowflake set . I painted them gold and added a red flat back pearl to the  centers.
To finish it off , I outlined with stickels.  


Up next is a Christmas tree.
I started with one of the banner pieces turned up side down.
I brushed Gesso over the tree and added a scalloped piece
to the back.
Then came the layering of the ornaments. I topped it off with a
white seam binding bow.
Hope you give these a try , my son will be making a few today !
Products used -
Mitten Micro Mini
Build-A-Banner Set
Snowflake Shape set

Saturday, November 16, 2013

Let it snow...

...Let it snow
Good morning, Deann here with my DT project
for Gina's Designs
I found a box of really cute cards at Tuesday Morning
and knew exactly what I wanted to make !

I cut apart one of the Border Sticks to make the
Snow Sign
I painted the frame white and red on the bottom layer
so the red would show through the cut outs.

To the front of the easel I added
a bow out of red seam binding, a candy cane,
rosette ,some greens and poinsettia
and a snow flake.  

I painted the easel a soft blue to match the blue
in the card.


Products used :
Border Sticks 
Victorian Frame & Easel 
Thanks  for taking a look :)
(((HUGS)))
Deann

Monday, October 28, 2013

My Gina's Designs DT Project

Halloween Canvas

Good morning  ,Deann here with a Halloween Canvas.

I started with the Old Bottle Shape Set. I used Distress Inks to color them. Then rubbed white gesso onto
some of the edges of the bottles.
Then I printed out the Freebie Friday Spooky Labels from Gina's blog.
Cut them out, inked the edges and attached them to the bottles. 


Next I prepped the canvas.
I used a paper towel crunched up to tap  gesso onto the canvas. It adds a little texture .
Then I used the Brick Wall  Chipboard pcs. I used the Individual Bricks from the set.
When everything was dry ,I then painted over everything with rust, orange and brown paints.
I used the paper towel to add the paint . I dipped it into the paints  kinda mixing them together but not a lot.
When that was all dry  (I used my heat gun a little) I took my Walnut stain Distress ink pad to
the edges of the canvas and over the bricks . 


I then added the bottles to the Canvas. I used pop dots for the 2 green bottles.
Thanks for taking a look :)

Products used -
Gina's Designs Chipboard
Brick Wall
Old Bottle Shape Set
Gina's Designs Printables
Freebie  Friday Spooky Lables

Sunday, October 20, 2013

Ticket swap for YPP

  This Months theme is Thankful
We had to make 3 sets of 5
different tickets.


All of the chippies are from
Gina's Designs


Packaging I made for the ticket

Thanks for taking a look
(((HUGS)))
Deann

Friday, October 18, 2013

Freebie Friday with Gina's Designs !

I love to have Tea with my Family and Friends!
Fall is the best time of year...in my opinion :)
All month Gina has been giving away Fall printable s
that you can mix and match .
I 'm using them to decorate for my Fall Tea.


I made the napkin ring with a pc. of paper
towel roll, printed out an extra favor box on
copy paper and covered the roll.
I added some seam binding and leafs to it.

Menu Card

I thought it would be nice to use the smaller card
to write a note for the hostess 

The first week freebie was a leaf pattern.
That is what I used on the front of the pocket.


Favor Box

For the place card , I just added a cluster of leafs to the top.
   

Monday, October 14, 2013

BOO !

~ Boo~ Banner from Gina's Designs

Good morning :)
Deann here with todays project for Gina's Designs
I LOVEEEEEE Banners!
It's one of my favorite crafts to make and the Build a Banner from Gina is awesome to work with!
I choose the letters BOO


Thanks for taking a look :)
(((HUGS)))
Deann

Products used :
Build A Banner
from Gina's Designs

Thursday, October 3, 2013

A Shabby Treat

This is an order for a Lavender Farm
I love the Shabbiness of it !  

I stamped the bee twice so I could layer
the wings for some dimension
Colored it with my copics 


I also used chipboard butterflies
from Gina's Designs
The Build A Banner is also from
Gina's Designs :)
Thanks for taking a look !
(((HUGS)))
Deann